2009: The Year of the Dreamer

This year’s calendars are a lot of work, but I’ve well pleased with them! Delighted, in fact.

Vintage yearbook pictures of all sorts grace the covers. There are weekly planner pages, illustrations to color with the included pre-sharpened colored pencils, and an attached file band that you can use to close your book or mark your page.

Every one has a different cover! You can pick a theme, sport or age group, and I can try to match it.

And a different picture inside, too. There’s also the 2009 at-a-glance calendar.

Big montly calendars fold out. Each month there’s a quick activity/list on the flap…

…and a bigger one on the opposite side. The months are all bright colors…

…and the folded edges form sturdy tabs to make flipping to your desired month quick and easy.

My inexpertly rendered drawings came from yearbook and family photos.

Inside the back cover, there is a handmade pocket made from recycled commercial calendar pages (see! hanging on to my 90s calendars for a decade wasn’t idiotic!) and recipe cards, and a strip of stickers mounted next to it. Yay!  Buy one here!

It’s Calendar time!

I love calendar time! I hate calendar time!

I love calendar time because my calendars are fabulous and marvelously fun to make. I also love calendar time because I love love love a new year. It’s the big annual mulligan for the year before. But I hate calendar time because I’m always behind as it is, and designing and mass-producing a handfinished product always kills me. Of course, my version of mass production is only a couple hundred.

This year, every single cover is different (hand-cut from old 50s and 60s year books), and besides matting (read: placing atop a slightly larger paper cutout; nothing dramatic and professional) them all, I’m also laminating them all, because the hand-applied cutouts can get a little fragile over time. But I need to keep the edges all orderly and clean so they can be bound properly. So laminating also means trimming and trimming and trimming and relaminating and relaminating and relaminating. As much as I love spending my afternoons shaving off hairline curls of plastic with a razor blade… you know.

2009 is The Year of the Dreamer. And the old yearbook pictures are so much fun! This year, people can order a surprise, or they can ask for a general category. Really, you could ask after something really specific, but it’s a crapshoot whether I’ll actually have it. There are class photo grids and group pictures from grade school to high school, extra-curricular clubs, various sports, classroom scenes, senior portraits! Many of the 60s yearbook candid shots have corny captions, about what you’d expect from a 1960s yearbook staffer.

Specifically, there are (many only have one in each category): cheerleading, drill team, pep squad, marching band, twirlers, orchestra, drum majors, classrooms, swim team, tennis, football, basketball, school dances, grades K – 12, groups of prissy girls, groups of dapper young men, queens, bowling club, class officers, school dances, baseball, cafeteria and snack bar ladies, groups of little children in freaking adorable 50s outfits, goody-goody 50s hair (boys and girls), and lots and lots of poufy Aqua-Netted 60s girls’ hairdos.

If you haven’t seen my calendars before, each year a choose a theme, and they include pictures to color, grown-up activities, and weekly and monthly engagement calendars. I try to use salvaged or recycled materials & they’re all hand-finished. This year, in addition to the one of a kind, fancy laminated covers, I’m also making pockets out of the glossy color pages of old wall and engagement calendars I’ve been hoarding for theoretical future craftiness. One of the calendars I’m using was from 1997! My birthday was marked “27 years old, and what have you done?” Sigh. Back when 27 seemed an advanced age. Oh! And they come with a little package of colored pencils!

Here are some more of this year’s covers:

P.S. They’re for sale here (the photos on the store page are from last year–I’ll be adding pictures of the 2009 finished product this weekend).

New Art Club Fiber

And more to come! I’m carding my ass off. New at ARTCLUB.etsy.com.

BLUE MORPHO superwash merino cuckoobatts:

MY LITTLE PONY wool & sparkle kangaroo cuckoobatt (with goodies tucked inside):

HOT TO TROT superwash merino, bamboo and sparkle cuckoobatt:

PITY PARTY cuckoobatts+ pound of fiber wool, merino, alpaca, mohair, bamboo, sparkle, thread

DRAGONFLY merino cuckoobatt:

NINNY local spotted merino combed top (from my ewe lamb’s mama!)

NEW ODDSIE/ENDSIE JUMBLE BAGS superwash & regular, in new reusable project bags:

Plus natural colored fiber samplers & more!

Questionnaire & book giveaway

This comment came in on my Winter Woolfest post & I though it was worth bumping up! It takes 5 seconds and you could win a lovely Stewart, Tabori & Chang book.

We’ve heard that this is going to be an extra-crafty holiday season and we’re excited to learn more about how people are making the handmade part of their gift-giving plans.

We’ve posted a little holiday questionnaire on our blog and we’d love it if you would share the link with your readers (and answer the questions yourself, of course). The more the merrier.

On December 12, we’ll randomly choose five responses and send the writer of each one the STC Craft book of his or her choice.

Happy Handmade Holidays from STC Craft!

I’m gonna go post mine now!

Winter Woolfest + Spinsters + Spin-off!

I’m so excited to have a new fiber festival right around the corner (well, in country terms; it’s still an hour away :)). Jennifer Schermerhorn (Settlers Farm yarn & fiber shop, Whirled Yarn, and Yarn School) is organizing a fiber festival this January: Winter Woolfest. The date (Saturday, January 10) was chosen in honor of Roc Day (aka Rock Day aka Distaff Day; January 7), the traditional day the women returned to spinning and weaving after 12th Night. But with Jennifer’s style & charm, that will probably be the most traditional thing about it.

Jennifer is such an inspiring fiber enthusiast. She keeps a spinner’s flock of sheep, goats & bunnies, teaches fiber classes in the community, including a lot of kids’ classes, and runs an amazing yarn store in Wamego. And she’s got three young kids, three dogs, and who knows how many cats & chickens. I just think it’s amazing the way she really promotes fiber in the community & especially to kids (she says the boys are always the most enthusiastic spinners!). Kansas can be amazing and inspiring, but it can also be really conservative and closed-off and fuddy-duddyish, so it’s a thrill when people get really excited and actually do things!

Okay, before I get all misty-eyed, some details…. There will be free demonstrations, yarn & fiber vendors, mini-classes & activities for the kiddies. It’s also a great opportunity to get local fiber! And if you want to bring along non-fiber friends & family, Wamego’s also home of the famous Oz Museum.

I’m going to have a vendor’s booth there, complete with a fiber grab bags & a DIY carding station, and I hope to give some fiber demos. If you want to rent a booth (prices TBA, but they’ll be very reasonable) or give a demo, contact Jennifer (from the Winter Woolfest link)!

Yesterday, we had a holiday  Spinsters Club at Jennifer’s store, and I was very naughty! I went, shall we say, a little over my gift certificate… Here’s what I got:

Frog Tree 2-ply merino in 2 colors, Opal Sock, Fannie’s Fingering Weight in Pecan Pie, Jojoland Rhythm self-striping marled, 3 bags of angelina, Toto’s Toes Sock, and Jojoland Cashmere, and some US7 16″ so I don’t have to use my Denise neeldles with the stitch holder cord to knit the sleeves on my Cobblestone. I hardly ever treat myself to hand-dyed yarn (after all, the price is the labor, and I have all those dyes… I always talk myself out of it but rarely actually go dye myself my own yarn) and I never buy luxury yarn, so two skeins of hand-dyed and a skein of cashmere were really nutty. But the cashmere was only $27 for 2 ounces, and the colors were stunning. I almost got a blood red, but I always get blood red (see–right in the same picture!) and this periwinkle looks lovely with the dark browns I constantly wear. Anyway, shopping! Woo hoo! About 40% went on my gift certificate. I should probably do some earnest destashing to cover the rest. But will I?

We also did a white elephant fiber swap. I LOVE what I got and I can’t believe I didn’t get robbed. Maybe I had a pathetic, pleading look on my face–I could kind of feel it rising up whenever anyone looked my way. I fully respect the santity of the white elephant and would never begrudge thievery, so I wouldn’t have begrudged the theft. And I would have totally stolen this from someone else, so it’s so exciting that it made it home with me! It’s dyed alpaca top and dyed-to-match kid mohair locks! And the greens are bluey enough that they will not make me look cadaverous. Hooray! Here’s my prize (it’s greener in real life):

Here’s what I brought to the swap:

4oz layered superwash merino/alpaca + sparkle batt. Jennifer opened it, but Cathy stole it. I think I’m going to make more for Art Club.

Hey, look! 2 previous Art Club Cuckoobatts, plus yarn made from it from a couple of batt club members, are in this month’s Spin-off! There were also batts and thoughts from Steph Gorin of Loop, Linda Diak of Grafton Fibers, Natasha Fialkov of Luxe Fibre, Jae Skuse of Wooly Treasures, and Scartabello of Terra Bella Spun, so they’re in charming company!

The bottom section shows Sea Hag cuckoobatt + yarns spun from it.

And here’s my favorite Art Club cuckoobatt of all time!

FREE PATTERN: Strawberry Baby Cap (NEW: another size!)

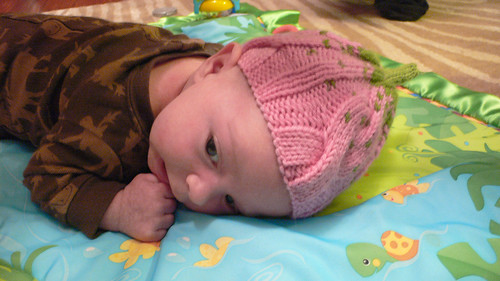
Baby photos by Kelly Sue DeConnick.
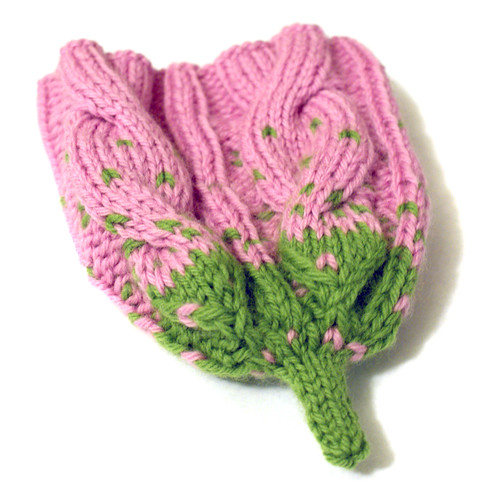
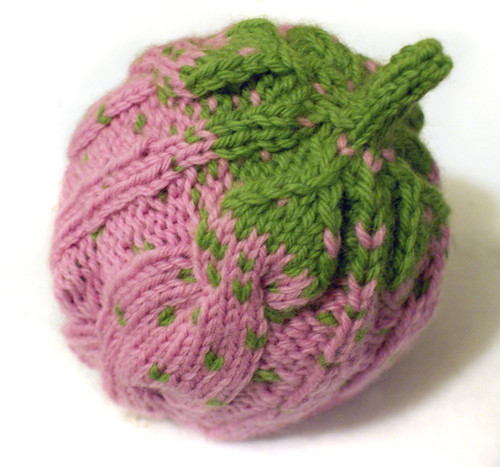
I haven’t re-tested my pattern, so please let me know if you find errors. And if you’re a chart wiz & want to chart the colorwork or cables, lemme know & I’ll add it! preemie/newborn shown

SIZE: preemie/newborn (3-6mos)

NOTE: The only difference between the sizes is that the larger size has K4-st columns separating the cable panels instead of K2-st columns shown here. You can make it increasingly larger by making those columns wider.

YARN (you can probably get 2 hats out of this)

1 ball Knit Picks Merino Style, in a berryish color

1 ball Knit Picks Merino Style, in a greenish color. I used Petal and Asparagus because that’s what I had on hand, but a darker red or raspberry color, and the darkest green, would look much nicer, I think.

NEEDLES

US3 DPNs, 2 circulars, or 1 long circular for magic loop (your choice)

INSTRUCTIONS

CO 72 (80) with berryish color. Join rnd, being careful not to twist stiches.

Edging (Note: you can use a size down to make this part snugger. It’s probably a good idea, but I did not.)

Rnd 1: *P3, K4, P2, K4, P3, K2(4), repeat from * to end of rnd.

Rnds 2-4: Repeat Rnd 1.

Continuing…

Rnd 5 and all others, except as noted (basic pattern): *P3, K10, P3, K2(4), repeat from * to end of rnd.

Rnd 10 (cable): *P3, C10B, P3, K2(4), P3, C10F, P3, K2(4), repeat from * to end of rnd.

Rnd 15 (1st seeds rnd): Repeat Rnd 5, but meanwhile, incorporate one green stitch every 4th st, starting with the 2nd stitch (i.e., 1 berry stitch to start, then 1 green stich, 3 berry stiches, 1 green stitch, 3 berry stitches… down the rnd). Carry green yarn loosely behind berry color so fabric doesn’t bunch, and loosely between rnds as well (there will be 3 berry rounds before the next green)

Rnd 19 (2nd seeds rnd): Repeat Rnd 5, but meanwhile incorporate one green stitch every 4th stitch (i.e., 3 berry st, 1 green st, 3 berry st, 1 green st…down the rnd).

Rnd 22 (3rd seeds rnd): Repeat Rnd 15.

Rnd 25 (4th seeds rnd): Repeat Rnd 5, and meanwhile, starting with first stitch, knit every other stitch green.

Rnd 26 (cable): Repeat Rnd 10.

Rnd 27 (5th seeds rnd): Repeat Rnd 5, and meanwhile, starting with second stitch, knit every other stitch green.

Rnd 29 (6th seeds rnd): Repeat Rnd 25.

Rnd 30 (1st decrease rnd, first green rnd): Change to green yarn (don’t break berry–you’ll use it again, making flecks in the green like the green flecks in the berry). *P3, K2tog, K6, ssk, P3, K2(4), repeat from * to end of rnd–64(72)st

Rnd 31 (2nd decreas rnd): *P3, K2tog, K4, ssk, P3, K2(4), repeat from * to end of rnd–56(64) st.

Rnd 32 (3rd decrease rnd + 1st berry flecks rnd):  While working decrease pattern, work colorwork pattern in the reverse of the first colorwork pattern. So, starting with 2nd st, and every 4th st thereafter, work one berry st every 4th st (i.e., 1 green st to start rnd, 1 berry st, 3 green st, 1 berry st, 3 green st… down the rnd). At the same time, work this decrease: *P3, K2tog, K2, ssk, P3, K2(4), repeat from * to end of rnd–48(56) st.

Rnd 33 (4th decrease): *P3, K2tog, ssk, P3, K2(4), repeat from * to end of rnd–40(48) st.

Rnd 34 (5th decrease): *K3tog, ssk, K3tog, K2(4), repeat from * to end–20(28) st.

Rnd 35 (6th decrese rnd + 2nd berry flecks rnd): Starting with green, alternate with berry every other stitch, and work the following decrease: *K3(2), K2tog, repeat from * to end.–16(21) st.

Rnd 36 (7th decrease): *K1, K2tog, repeat from * to end–8(14) st.

Rnd 37 (LARGER SIZE ONLY–8th decrease): *K2tog across rnd–7st.

Stem

Knit 9 rnds of stem.

Last rnd: *K2tog, repeat across rnd. Break yarn, use yarn needle to slip end through all live stitches, cinch, and weave in ends.
abbreviations

CO CAST ON
C10B Slip 5 st onto cable needle, move the cable-held stitches to the back of your work, K the next 5 st off your left needle, then K the 5 held st off the cable needle
C10F Slip 5 st onto cable needle, move the cable-held stitches to the front of your work, K the next 5 st off your left needle, then K the 5 held st off the cable needle
DPNs Double-pointed needles, a set of 4 or 5
K2tog Knit 2 st together as one
K3tog Knit 3 st together as one
P purl
rnd(s) round(s)
ssk slip 2 st knitwise, then knit those stitches together as one
st stitch(es)

Sheep!

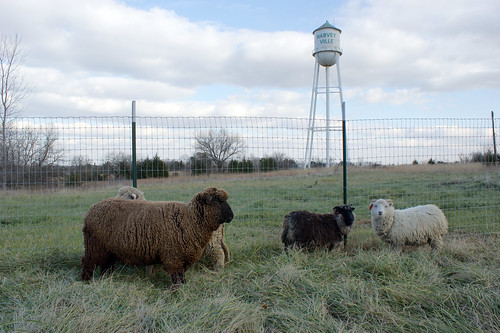
Yippee! What a big day! George from Ewephoria Farms came by mid-day with four beautiful sheepies for me!

Here they are, very much keeping their distance. They wouldn’t let me get close enough to get real closeups. Maybe this weekend? I’ll name them in a couple of weeks when they cozy up to me and I can tell a little more about their personalities. Left to right, we have: Chocolate Romeny yearling ewe, (black-factored) white Merino ewe lamb, and two Shetland wether (castrated male) lambs. I’d put them at about 150, 100, and 40-50 pounds each, respectively. The Romney is full-grown, the Merino will be slightly smaller than her, and the two boys will be about 100 pounds each.

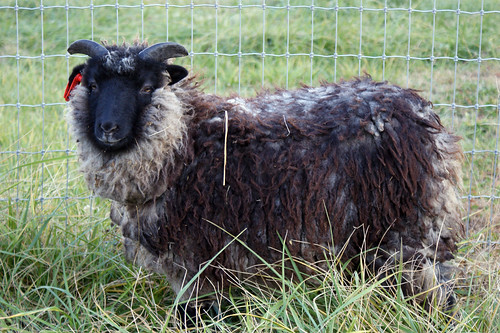
The boys are buddies, and very curious and friendly. Does anyone know what markings the guy on the left has? There are different names for all of the different Shetland markings.

Here he is on his own. I think the horns will curl around as he gets older.

George didn’t end up bringing the retired chocolate Merino ewe (Tina decided a move at her age would be disruptive), but he did bring an extra Shetland wether lambykin buddy for my other Shetland wether. He also brought goodies! He gave me two old hay feeders, which was great, because hanging the one I bought from Orshlen would have required framing in a brace, and these hang right over the poles in the barn–plus they’re cuter! He also brought a show-and-tell bucket full of supplies I should get, and gave me a explanation of what each is for. And half a bag of the sweet feed they’ve been getting to mix halvsies with mine so they can adjust, and a lead. Oh! And some LUSCIOUS combed top from Tina that I’m going to carry in my etsy store.

George pulled up the trailer and unloaded them one at a time, stopping to trim hooves and give worming injections. He sat the Romney or her butt, but worked on the Merino standing (she struggled a bunch, then finally  flopped over and lay down on her side). He let me watch/try trimming on the Romney & Merino–I was kind of timid about it, but I’m sure I’ll gain confidence. I think the Shetlands’ hooves were fine–but they’re way less daunting anyway because they’re friendlier and less than half the size of the others. He also demonstrated the worming injections–I used to give Kiki allergy injections & it’s the same, just a subcutaneous shot–and showed me how the oral dosing plunger thing works. I won’t have to worm them again until March. I don’t know whether I’ll go oral or injection. (Any advice?)

Let me tell you, the Merino and Romney wanted nothing to do with me! They wouldn’t let me anywhere near them, and bounded off to the farthest end of the yard whenver I approached, then eyed me with suspicion and/or contempt.

Soon I’m sure they’ll undwind and quit being so darn stuck up! The Shetlands were much braver and easygoing, especially when there was grain involved. They’re actually very doggy! But the two big girls wouldn’t even tolerate me with grain.

But by the end of the day, the boys were coming up for scratches, and the Merino was snooping around me while I rushed around in the twilight, trying to think of anything I might be forgetting. I’m hoping she’ll be friendly tomorrow so I can measure her for a jacket! By nightfall, the Romney was still suspicious, but even she was more relaxed.

I think I need to get a big bucket for their grain instead of the little tin I brought out today. I remember Tina had a great big bucket she used, and when I was walking around with a big plastic planter full of wood blocks to stuff into the depressions around the posts (I’ll replace them with dirt tomorrow), everyone found me suddenly charming and came over to investigate.

I still need to make the barn door, and get Ron’s help (or maybe have Ron and another boy do it…) moving the dead freezer out of the basement and out to the barn. I’m going to use it to store feed and mineral, since it’s vermin proof & airtight. It’s also big enough to  hold everything, for both the chickens and sheep (that’s: a bag of scratch, a bag of layer ration, a bag of sweet feed, one of sheep mineral, one of rock salt, and grit–and there will probably be plenty of room for other sundries as well. I may build a big shelf/table that goes over it where I can put the extra straw bales and the current hay bale (the feeders each hold about a quarter bale). I’ll have to do the math and decide if it will work with the freezer lid open. And I need to install the solar security light, and some small solar spots to give the chickens some PM light during the winter. Aside from that and flashing the eaves, and maybe adding some storage shelves, we’re pretty much good to go!

Here’s the back side of our recycled barn. I still need to make/hang the barn door. And we’re going to put the deck back above the roof so we can keep it as a patio space. The near side is old doors, the striped side is made of old baseboards.

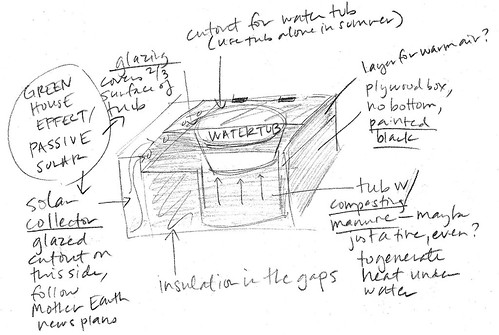
I also really want to design a winter water passive solar heater. Here’s my idea: an insulated plywood box, painted black to absorb heat. Inside is a sturdy tub filled with chicken litter and waste hay that will produce heat as it composts. Above it sits the rubber water tub, which rests in a cutout in the top of the box. Off to one side is a solar heat collector based loosely on the Mother Earth News heat grabber plans, with some ideas from an implementation I saw on Instructables. A hinged plexi cover covers 2/3 of the tub, so the sheep can still drink, but it’s less exposed to weather and can absorb some heat during the day. Maybe only the bottom 3/4 is insulated, and the top quarter of the box is open to allow flow of warm air in from the solar collector. Needs some kind of out vent, maybe leave a channel with holes at the bottom so as the air cools and sinks, it will flow back out? The solar collector will face south, and the whole apparatus will be sheltered from the north by the barn.

Sheep tomorrow! Hat tonight.

I need to go to bed soon, so I can be all bright-eyed and bushy-tailed tomorrow morning. I have to staple (big heavy farm staples, not staple-gun staples) a temporary barrier over the open area along/in front of the ramp of our crazy barn. In a perfect world, I’d actually put a gate there instead, and since I haven’t give up on the perfect world, I don’t want to completely commit to the horse fence plan. On the other hand, I don’t intend to put the hay in the same location next year, so a convenient gate right now will be more or less pointless later. I should probably go with the horse fence barrier as planned.

Anyway, none of this makes sense if you can’t see the barn, so I’ll have to take a bunch of pictures tomorrow when the sheep arrive!

What else? Oh, and it looks like there will indeed be a calendar for 2009, for those who have asked. The Year of the Dreamer. But it won’t be ready until the first week of December!

Made this tonight (unblocked):

Pattern: Leaf-Band Alpaca-Merino Hat from Luxury Yarn One-Skein Wonders

Yarn: Knit Picks Decadance, 1 skein

Time: Under 2 hours, even with frequent breaks to check on the soup I was cooking, do dishes, attend to the needy cats, etc.

Notes: Easy and cute. I left the nipple off the top (very last rnd) and added an extra rnd before the decreases. Next time, I’d add 2-3 extras. I have a small head which for some reason means hats always slip up off my head. (Do I like my hats pulled down too far? Are they too loose? It’s a mystery. Hats almost never stay on right.) Otherwise unchanged, except that I opted for one big button instead of 3 small ones. The button’s just for show, although I think I tacked my little fake placket down too tightly so it doesn’t have the right effect.

This is a Christmas present, and I think I have enough yarn to make a matching cowl or neck warmer. I also have one more matching button. Yay!