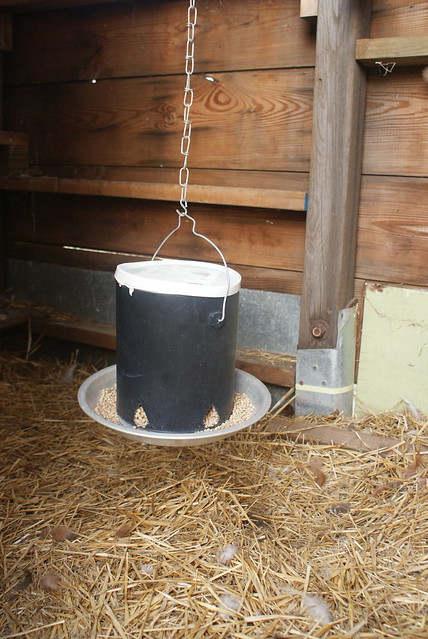
My original 4-gallon store-bought feeder, while very nice, is really just too big for 5 chickens. It’s so wide that mice seemed to have had no trouble hopping in from the walls of the coop. This summer, when I started letting the girls free range, I took it down completely, but now that it’s getting colder and the bugs and sprouts are slim pickins, I wanted to hang a feeder back up. My new one, homemade from a well-washed plastic paint can and an old pie pan, is high enough off the ground and hopefully far enough from the walls to minimize mice. I hope. Though once the heat lamp comes on and brightens the place, the chickens may well eat the mice. They do love mice.
I found these thrifty feeder instructions online. It took maybe 15 minutes to make (with stuff I already had on hand), and I had to cut out the holes. If you’ve got a nursery planter like the one in the video, it would take more like 2 minutes. I found my 5 roughly 1″ triangles to be a good size–enough to have decent flow without overfilling the tray.
In other barnyard news, I’ve got a few more projects in the queue to prepare for winter.
I’m going to use the ragged tarp from last year’s hoop house to line the coop walls when the temperature drops. I’m toying with making roll-up blinds like the one I made for the opening of my hay shelter so I don’t have to take them down and put them up each year.
The hay door rolls up and out of the way in fair weather, and rolls down and fastens to the pole on one side and one of those screw-in dog tie-outs on the other side.

I’ll need to shut off the hose and pull out the heated waterers when the temperature drops down some more. I want to keep that hose going as long as possible. I kind of really hate my heated chicken waterer. The heated part is awesome, but the overall design is fracking horrible. They’ve improved it a bit in the new model, adding a cord so you don’t have to plug you extension cord into under the water pan (where it’s usually damp), but it still has that fucking awful bottom-fill plug so you have to fill it upside-down and flip the whole thing in the freezing cold, sloshing water everywhere in the process. I’m not shelling out another 40 bucks to get water everywhere when it’s 5 degrees.
I’m really tempted to try to get the chickens to use rabbit waterers. I’ve seen several chicken forum posts about it, and the same company that makes the heated chicken & sheep waterers makes a heated small animal waterer, basically just a 2-qt version of those little hamster cage bottles. If the chickens can/will actually use it, it would be ideal. Even though it’s on the small side and would probably require frequent refills, you refill it from the top (yay!), so you can leave it in place after you mount it and just hit it with a pitcher. I also like that I’d never have to worry about mice, feathers, dust, or litter in the water. Plus it takes up a fraction of the space, appealing in a small coop like mine.
But there’s no rush. The short-term weather outlook is pretty mild (50s/30s), so I’ll think it over after Mitten School.
Another great do it yourself project for your flock is making a hanging chicken waterer with chicken nipples! I purchased my nipples from BAFXPro.com as they seemed to be cheapest and then I just screwed them into the bottom of some buckets, filled them with water and hung them up for my flock! It works great, keeps the water poop free and clean!
I highly recommend them ;)
I actually made one a couple months ago, but I don’t think the chickens are actually using it (I’ve refilled it once–and it wasn’t dry–& there are 5 birds, so…). Any tips on turning them on to it? I’d like to make sure they understand it before it gets hot.