Lacy merino heirloom blankets are lovely, but this practical hooded cotton baby blanket is cute, cool, and machine-washable, making it a welcome gift for hot and sticky summer newborns. It’s a cute and cushy poolside wrap for baby, but it’s equally handy at bathtime, when the hood holds the wrap steady to help dry a wiggly baby. And toddlers love it as a play-time cape.
As for customizing, the pattern gives you plenty of room for leaving your own imprint with trim, pattern, and color. Trim with broken rib (shown), seed stitch, garter, picot edging, or multi-colored stripes. Use a single color, contrast trim, a million skinny stripes, or mom or dad’s team or school colors. And if all that stockinette makes your eyes cross, whip out your stitch dictionary and make the sampler version instead.
I used Lion Brand Cotton Ease, but any worsted machine washable cotton blend will work. (All-cotton will work, too, but the blend brings a little more bounce to the fabric).
Knitting for a winter baby? Make a cool-weather version in superwash merino like Karabella Aurora 8. For a winter version, when the added bulk will be appreciated, you could even work in your favorite Fair Isle pattern.
YARN
3 balls Lion Brand Cotton Ease (3.50 oz./100 g, 207 yd/188 m, 50% Cotton/50% Acrylic), all 3 the same, or 1 ball in contrasting color for trim, if you wish
NEEDLES
US 8 (5mm) 32″ or longer circular needle
Sharp yarn needle for finishing
SIZE
26 x 26 in (66 x 66 cm) with 8 in (20 cm) deep hood
GAUGE
16 st = 10cm (4 inches) in stockinette st
 PATTERN
Blanket
Plain (shown): CO 100 st. Work 24″/61 cm in stockinette st. BO loosely.
Sampler variation: Use your favorite stitch reference to select 2 – 16 different pattern stitches for your sampler. Select patterns suitable for 22 st (you can always flank the main pattern with a few columns of knit stitches if the number isn’t exact).
You can simply alternate checkerboard-fashion, between a patterned square and a stockinette square, or work every square with a different pattern. If you’re using several patterns, you might want photocopy the swatches from your reference book and arrange them in a 4×4 grid to make sure you’re pleased with your overall pattern.
C0 100.
Row 1 (WS): Knit.
Row 2 (RS): Purl.
Row 3 (WS), set up sampler grid: K3, PM, K 22, PM, K2, PM, K 22, PM, K2, PM K22, PM, K2, PM, K22, PM, K3. The markers designate your sampler squares, plus their dividing grid.
On Row 4 (RS), begin your sampler squares, purling all stitches outside of the 22-st blocks. Work each set of 4 squares until the square itself is 4″ (10 cm) tall, then work 3 rows in reverse stockinette (purls showing). Begin next set of 4 sampler squares, and repeat until you have a 4 x 4 grid, complete with final 3 rows of reverse stockinette. BO.
Hood Front
CO 39 st.
Work in stockinette throughout, decreasing as follows:
Every RS (knit) row: K1, ssk, k to 3 st from end, k2tog, K1
Every WS row: purl
When you have 5 st remaining, work WS (purl) row as usual, then this RS row: k1, sl 1, k2tog, psso, k1—3st.
BO.
With WS facing, seam hood to blanket corner with mattress st.
Sampler variation: substitute a patterned stitch of your choosing for the stockinette, maintaining the plain decreases and knit stitch at either edge.
Edging
With stockinette side facing, and starting in the corner opposite the hood, PU st all the way around the blanket. PU one st for every st along top and bottom of blanket and open edge of hood, and 3 st for every 4 rows along sides of blanket. As you go, place a stitch marker in each of the 3 blanket corners.
As you work, you’ll place an increase of your choice before and after each marker every other rnd.
Work edging of choice (broken rib shown) for 1 inch, then bind off.
Edging Suggestions: Broken rib, seed stitch, garter stitch, moss stich, picot edging, simple eyelet, etc.
Broken Rib:
Row 1: *K1 P1, repeat from *
Row 2: Knit.
Finishing
Weave in all ends. I prefer to use a sharp needle and split the yarn as I weave in the ends, as the cotton doesn’t have the nice fiber grab of wool. I work in one direction about an inch, then double back, working through the woven-in portion of my yarn end on my way back, to make it extra secure. If possible, hide the very end of the tail in a seam or picked up edge.

Nikol,
I’m delurking to say that I made this baby blanket for my babe-on-the-way a couple of months ago and I loved how it turned out! I used Cascade Luna and made it in colorful stripes with a cream edging. Thanks so much for a cool design!
Awesome!
I was just thinking about making this for my neighbor’s baby last night! Then here is the pattern on craftzine! Thanks so much!!!
your blanket looks great, love the colors too
thanks for sharing the pattern
Wow, what a great item. I just found out 5 people I know will be having babies before this November, this is a perfect pattern for a gift.
Thanks!!
Thanks for posting this. It really is a great pattern!
Oh thank you for re issuing this pattern it was on my to knit list for charity.
Thanks so much for posting this so quickly! I had JUST gotten the yarn for two of these when the Magknits site went bye bye before I had a chance to print it. I can’t wait to start them!
I have NEVER sewn anything, but I came across this and I really love it! Is is something that a beginner should even atempt? I mean, how difficult is this to make, honestly?
I love this pattern. This has to be my favorite blanket, I am just sorry I didnt think of it first. Thx for posting.
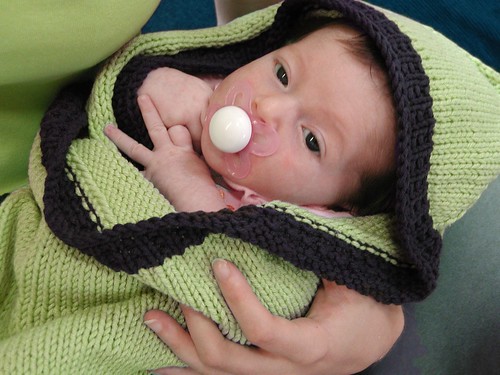
What a beautiful baby! I don’t have anyone to make the blanket for, I just had to comment on the beautiful baby!
By the way, I love your blog. I’m going to put a link to it in mine so that someday, when people actually read it (*smiles*) they can ready yours, too. Happy knitting!
Would anyone have a baby pattern for making overalls. I am trying to find a pattern so I can make overall for my 9 mth old daughter. I need the pattern have sizing up to 24 mths.
Can anyone help. If so you can email me at izabelle76@hotmail.com
Thanks!
I don’ understand the edging part. I tried pu with WS facing and it doesn’t look right. Should try pu on the knit side? I’m loving the way my blanket is looking already. Can’t wait to use it for my first baby due in Feb.
I love the color combination!! And that baby is toooo sweet!
I Love this Item and at the moment I’m trying to work out what Wool I need as I’m from the Uniter Kingdom, and here it would be In Double Knit , Quick Knit or 4Ply…I guess
Any Ideas would be Appreciated…
maxine I’m responding to your comment op the 21st of October. Have you found out what yarn to use in the UK? I am about to go the the yarn shop and buy cotton for this baby blanket (will be a grandmother for the Very First Time in February).
And on a more general note: what does PU mean and ssk and psso?
A am Dutch and I am just learning to read knitting patterns in English. It is like learning yet another language…
Thanks!!!
Karin–use any machine-washable worsted weight–I don’t know what the UK name is, but you should be able to look it up fairly easily–or just check yarn labels for the same gauge.
PU= pick up stitches
ssk= slip, slip knit (decrease)–slip 2 stitches knitwise, then slide them back over to the left needle and knit them together as one
psso= pass slipped stitch over (decrease)–pass the previous slipped stitch on your right hand needle over the stitch directly to its left on the right needle. It’s sort of like binding off one stitch.
Nikol, Thank you so much!! I will go out tomorrow and buy the yarn. I will be in the States from next week on and I am looking forward to some knitting there! It is such a pity “We” (the knitters of this world) cannot knit on transatlantic flights! Oh well, I’ll finally get to read some books then or do sudoku (I’d rather knit though).
Thanks again for your explanation of the abbrv.
I have a question–as a beginner knitter, I recently made a scarf, all in stockinette stitch, which of course curled up and was unusable. This pattern uses all stockinette stitch. What prevents it from curling up? Does it curl up until the trim is added? Thanks :) Susan
Yes, the edges curl until it’s trimmed. But a wide swath of stockinette won’t curl as dramatically as a narrow width like a scarf (or maybe it does curl just as much at the edges, but it’s a much smaller percentage of the whole?).
Hey. I can’t pick up all stitches right around blanket. Do I need to use a circular needle or do I do each side separatly then join the ends? I’m a lil confused….New Knitter.
Use a circular needle and pick them up all the way around.
Has anyone seen a pattern for a hooded baby sweater that opens in the back?
help im having issues with the hood am i supposed to make it seperatly or is it all in one AAAARRRRGGGGHHHH!!!! If its all in one then i am so confused!!
This makes me want to learn how to knit! Beautiful and just love the simple design! You could definitely have fun color coordinating with mom- too cute!
Sibby–It’s separate! Look down at the end of the hood section–you’ll seam it to the corner before you do the edging.
Wow… that was just so simple… well, I guess I have to start making one :)
i get it now as soon as i had submitted my last comment it clicked haha thank you though!!!
hmmmm…..
I guess I’m gonna learn to knit, that is just to CUTE!
((the baby is sweet to))
can someone clarify for me something on the border? am I supposed to be working “in the round” or do I work back and forth like the rest of it?
Eyla–in the round.
hi can you tell what PM means on yiour pattern and how many stitches for the hood ??
I just finished this blanket and it is so adorable! The only problem I had was with the increases around the corners of the edging. Since I didn’t have a favorite – I’m a very new knitter – I just used a make one (loop), and ended up with some fairly large holes. Is there a better increase to use? I’m going to start another one of these with some new yarn and it would be nice to get it right the second time around.
Thanks.
I think I knit into the front and back of the stitch to increase. Do you mean a YO (yarn over)? A M1 increase, aka invisible increase, is the one where you lift the bar between the stitches from the front and knit into left side of it (twisting the stitch). It shouldn’t cause a hole, so that would be a good choice, too.
Side note, you may already know all this: If you lift the bar for a M1 but knit into the easy side (right if you lifted from the front, left if you lifted from the back), it wouldn’t twist the stitch, which would also make a hole. If you remember to always knit into the more awkward leg of the loop when you lift it, then regardless of which side you lift from, you’ll always twist the stitch, preventing a hole. If it’s not really tight to knit the M1 stitch, it’s not twisting. Twisting the stitch basically just cinches it up a bit more before you knit it. Imagine taking a live stitch off the needles and twisting it around a couple of times. Each time, the loop available to knit into gets smaller, so the stitch you make gets tighter. Make sense?
Thanx for this really cool pattern. I´m from Sweden so normally i read knitting patterns in swedish, so obviously I had a bit of a hard time figuring this english pattern out, but I eventually got it somewhat right and the result is really really nice :) I had to improvise sometimes and i did my own little interpretations, but overall (or is it over all with a space between the words..haha, well it doesn´t matter anayway) the pattern was quite easy and fun to do.
So thanks again //Tina from the right now very very snowy Sweden (so our babies really do need a blanket like this :)
I an knitting the hooded baby blanket and got to Hood front, Iam not sure what ssk is. it says K1, ssk, K to 3 st from end. how and what is ssk?
ssk= slip slip knit (slip next two stitches, one at a time, knitwise, then knit them together as one)
pm=place marker
sm=slip marker
This is a great pattern for a summer baby. I am going to knit this over the next two weeks for my next grandchild … due some time at the end of the month.
Great pattern! Thank you! I’m knitting a few of these to donate to a charity. They’re perfect! My SIL is pregnant now, too, so she will most likely get one, too!
I hate to ask but…while doing the checkerboard pattern do you do only row 4 for 4 inches or do you alternate between row 3 & 4. I was a bit confused. Thanks for your help! I’m making this for our first baby.
This is my favorite pattern! I have made several and they have all been used as THE blanket baby gets brought home it, Highest compliment there is I think.
Jess~ If you purl 10 sts then k 10 then when you turn you will do folow the pattern until the stiches and rows makes a nice square. Hope this helps
hi! i am a beginning knitter and am making this in superwash merino for my baby girl, who is now three months old. i have increased the pattern from 100 to 150 stitches for the blanket. how would i increase the pattern for the hood if i wanted to make it a few inches deeper? thanks, laurence
Hi, Laurence! It turns out your geometry teacher was right (you do need geometry in real life!). The hood piece is a right triangle w/2 equal sides, so the depth of the hood (corner to center of CO edge) will be half the length of the CO side. So if you add an extra 16 st/4″ when you cast on, then you should get an extra 2″ of depth.
If you want it 3″ deeper, CO 24 extra st, and so on. For every 2″ extra you start with, you’ll get 1″ in depth. Yay, math!
Hello I sumbled upon this webpage by sheer luck, I was digging around for New Designer Fashion when I came upon your website, I must say your webpage is really cool I just love the layout, its amazing!. I’m in a bit of a rush right now to entirely read through your blog but I have bookmarked it and also signed up for your RSS feeds. I will be back in a day or two. Bravo for a great website.
these cotton made blankets really looks lovely, The baby will feel warm because of the love and care that where spend for putting up these blankets together..
Hi, i was looking around for baby products, and i came upon your site. The picture of the baby in the ladies arms was very soothing and it brought back memories of when i had my children that small. Ive knitted a few sweaters and it can be quite relaxing doing it! Im not very good at it, and always marvelled at how some people are such great knitters. Thanks for sharing the pattern as i may be able to knit for my grandchildren one day!
warm regards and a Happy New Year, 2010…
Christina
Thank you for this pattern! I was looking for simple baby things to sew for when mine comes and as I haven’t knitted since I was a child, I needed something easy – this is perfect!
I have just completed the hood and main part of the blanket and am getting to the edging. I’m going to do the rib edge that you have suggested, but I was wondering if you could clarify what you mean by PU “3 st for every 4 rows along sides of blanket”? Doesn’t that mean I am missing out 1 stitch every 4 rows? And how do I know which 3 to pick up?! A little bit confused … Thanks for any help!
Yes, you skip every 4th row–so if you have 75 stitches and 100 rows, you’ll end up with a full 75 st along the top and bottom, but only 75 stitches (3 out of 4 rows’ worth) along the sides of the rows.
adorable, I love it.i am just crocheting a baby blanket, thinking about making the hood as well -what are the measurements of the hoody triangle? Thanks so much.
in answer to Tracy’s 25 Dec inquiry … hooded sweater that zips from the top back of the hood down to the bottom of the back. Mary Maxim has a pattern. If you send them a note they can tell you how much the reprint is. It is every mother’s dream sweater!!!!
Hi, relatively newby knitter here. Most of this blanket makes sense to me, and I really want to try it for the 3 babies I know due this fall. However, I’m a little confused about the border. I get the concept of knitting around in a cicular fashion picking up stitches at the corners and at the border, but I’m confused about how you keep your stitches going? What tool(s) should I use or is it possible to knit each side one at a time and then join them at the end?
Miss Fitz–Use a long circular needle and work around and around. If you don’t have one I think it would be fine to knit each side flat as well.
I really like this blanket..But I was wondering if anyone had a pattern for a car seat blanket with the hole in the middle so the buckles can be seen on the outside…Thanks
Perfect pattern! Been searching for a pattern, and this looks awesome! Thank you!!!
I am confused about the hood? Do you knit a row pearl a row and then immediately start the decrease row?
Love this easy pattern and the color choice, too. I make many of the items for babies and children from Cotton Ease — great feeling, easy to care for, and wonderful non-traditional colors.
I like using the applied I-cord edging. While it may sometimes be a bit more labor intensive, it creates a beautiful finished edge.
I’m having trouble with picking up the stitches to make the border – I did it with WS facing and ended up with a rather large seam-like bump all the way around…doesn’t look like the picture at all. Should I pick up the stitches with the RS facing?? Any help would be GREATLY appreciated! I’m trying to finish this for a shower next weekend!
Thanks!!
I have to confess it was so long ago that I don’t remember, and I gifted the blanket years ago, but it certainly *looks* like they’re picked up from the RS…
I just changed it to say stockinette side.
Have been wanting to do somthing like this for ages but haven’t had the excuse to till I remebered that one of my cousins is due to give birth in October and i want to make something special for her. Emma and her hubby have always been called two peas in a pod (so much so that they had little peas in pods salt/pepper shakers as their wedding favors) so I’m going to make this bit have the trim in a darker green and also make my own decrotive patch to go on the hood which will say Pea Pod. :) Can’t wait to see the baba in it!
Hi!! This has been such a fun pattern! I have a question if you’re still looking at this…. My gage got off somehow, so 100 stitches made 20″ for me, which is fine, except I did the sampler and a 4×4 grid of 4″ squares came to 16 inches of course :) I figure I must have read it wrong, since I have a rectangle instead of a square ^_^ and would have a big rectangle if the side was 26″ like it should have been. Should I just add one more row of 4 inch squares to have a 20X20? Thanks again!!
That sounds like the perfect solution!
PM=place marker
I am a newbie n confused of how to incorporate patterns into the pattern when they call for more stitches then we have .
I am not new to knitting- but somewhat new to picking up stitches like this for the edging- been reading about it and it seems there is “pick up” where you just put existing stitches on to the needle, and “pick up and knit” where you loop the new yarn through the edge and around the needle.. Which should be used here?
Also I messed up with yarn weight and made a rectangle so I doubt I’ll be able to knit the edging in a round on the needles I have, has anyone had luck doing the edges each separately and just joining them?
Thanks!!
People often use PU and PU & knit interchangeably. Just go by the context. If you see “PU” and there are no held stitches waiting for you, then you just assume that it means pick up & knit, where you make new stitches.
There’s no reason you couldn’t do the edging one side at a time, it just would be more of a log cabin style than mitered corners.
I really love this cute little hoodie blanket for baby. If I would have baby someday, I”ll try to knit for her/him in the future.
It’s so adorable! I love it. I am starting to knit a baby blanket, thinking about making the hood as well -what are the measurements of the hoody triangle? Thanks so much.
Hi, I absolutely love your blanket and the choice of colors! Does it curl because of the stockinette stich?
Thanks
Jasmina
Between the yarn and the edging, it’s not too bad. It might be curlier in wool…
Hi just a question I knitted the blanket but just not sure how big the hood is supposed to be it just says to cast on 39 sts the rest so my question is what is the final measurements
Can anyone help me plz want to finish this blanket but I am confused on the hood what r the measurements before u start decreasing